

How To Shoot With Dslr Camera
Finding the Universe contains affiliate links, significant if yous make a purchase through these links, we may earn a committee at no extra cost to you.
So yous've got yourself a new DSLR camera! Congratulations, there's a whole earth of photography possibilities about to open up to y'all. But yous might exist wondering, every bit you lot open up the box and check out the lengthy how-to transmission, exactly how all-time to become nearly getting the best (the nearly?) from your new camera.
Well, I'm here to assist. I've been shooting with a DSLR camera since I was thirteen years old, starting with a film Canon photographic camera, and at present on a professional full frame Canon digital body. I teach an online photography course, and take been lucky enough to help people all over the world get more than out of their cameras.
In today's post, I'1000 going to break down in simple terms the primal features of your camera, and give you all the well-nigh useful tips that yous need to become the near out of information technology.
This guide is written specifically to assistance a new DSLR photographic camera owner, but will also be largely applicable to those of yous with a mirrorless camera. However, if yous do have a mirrorless camera, you might prefer to read my guide to using a mirrorless camera, which will be more than applicable. I too take a guide to using a betoken and shoot camera.
This post assumes no prior knowledge of cameras or photography, and hopefully volition help yous understand the features you have bachelor to yous, as well as get you out and shooting better photos quickly.
All the same, please don't be frustrated if it takes a chip of fourth dimension to primary some of the concepts of photography. Photography is a skill that takes fourth dimension to principal, and many of the principles of photography are not necessarily obvious or intuitive. With time and patience though, information technology will become second nature!
I appreciate that the globe of photography jargon can exist a footling overwhelming, so I'm going to get-go with the basics.
Table of Contents
What is a DSLR Camera?
A digital unmarried lens reflex, or DSLR camera, is a camera with an internal mirror and prism system. This organisation is used to directly the low-cal from the lens up to the viewfinder that you wait through to compose the image.
I appreciate this may sound a lilliputian opaque, so allow me break it down a flake.
All digital cameras substantially work in the same way. Commencement, light is nerveless and focused by a lens, and then captured on a digital sensor. The sensor saves that light information into an paradigm file that you lot can view and edit.
The difference betwixt a DSLR photographic camera and the other cameras on the market place today is that a DSLR has this mirror and prism system which is used to send light to the viewfinder. If yous take the lens off a DSLR and wait within the lens mountain, you lot'll see the mirror sitting at around a 45 degree angle. It's merely reflecting the light upward towards the optical viewfinder.
When you press the shutter button, the mirror will flip up inside the camera, out of the fashion of the sensor. And then the calorie-free will laissez passer onto the sensor to record the prototype. This is why, when you take a photo with a DSLR camera, the viewfinder goes dark when you press the shutter push. The mirror is no longer reflecting the calorie-free, and so the viewfinder goes dark.
In that location are some other differences betwixt a DSLR camera and the other types of camera available, which are covered in more item in my post on DSLR cameras.
DSLR Photographic camera Controls: A Guide
When you showtime take your new DSLR camera out of its box, you are going to find that it has a lot of buttons and dials. And these can certainly exist overwhelming. Which is likely why so many people I teach photography to confess that they just leave their photographic camera in Auto and promise for the best.
For the most part, on a mod DSLR photographic camera, Auto fashion will really do a pretty decent job in fourscore% of situations.
Nonetheless, this also means that there are going to be times (let's say 20%) that you aren't going to get the shot yous want if you get out everything up to the camera.
Because of this, learning how to use your camera to its fullest potential, and taking full control, should definitely be your end-goal.
Don't worry if this takes you some fourth dimension, or if y'all don't understand everything at once. As I've already said in this postal service, photography is complicated and learning how a camera works is a process that takes time and do.
A good start is reading a post like this, merely exercise also consult your manual for your camera model. If your camera didn't come with a manual, you can usually find relevant data by searching online for "your photographic camera model manual".
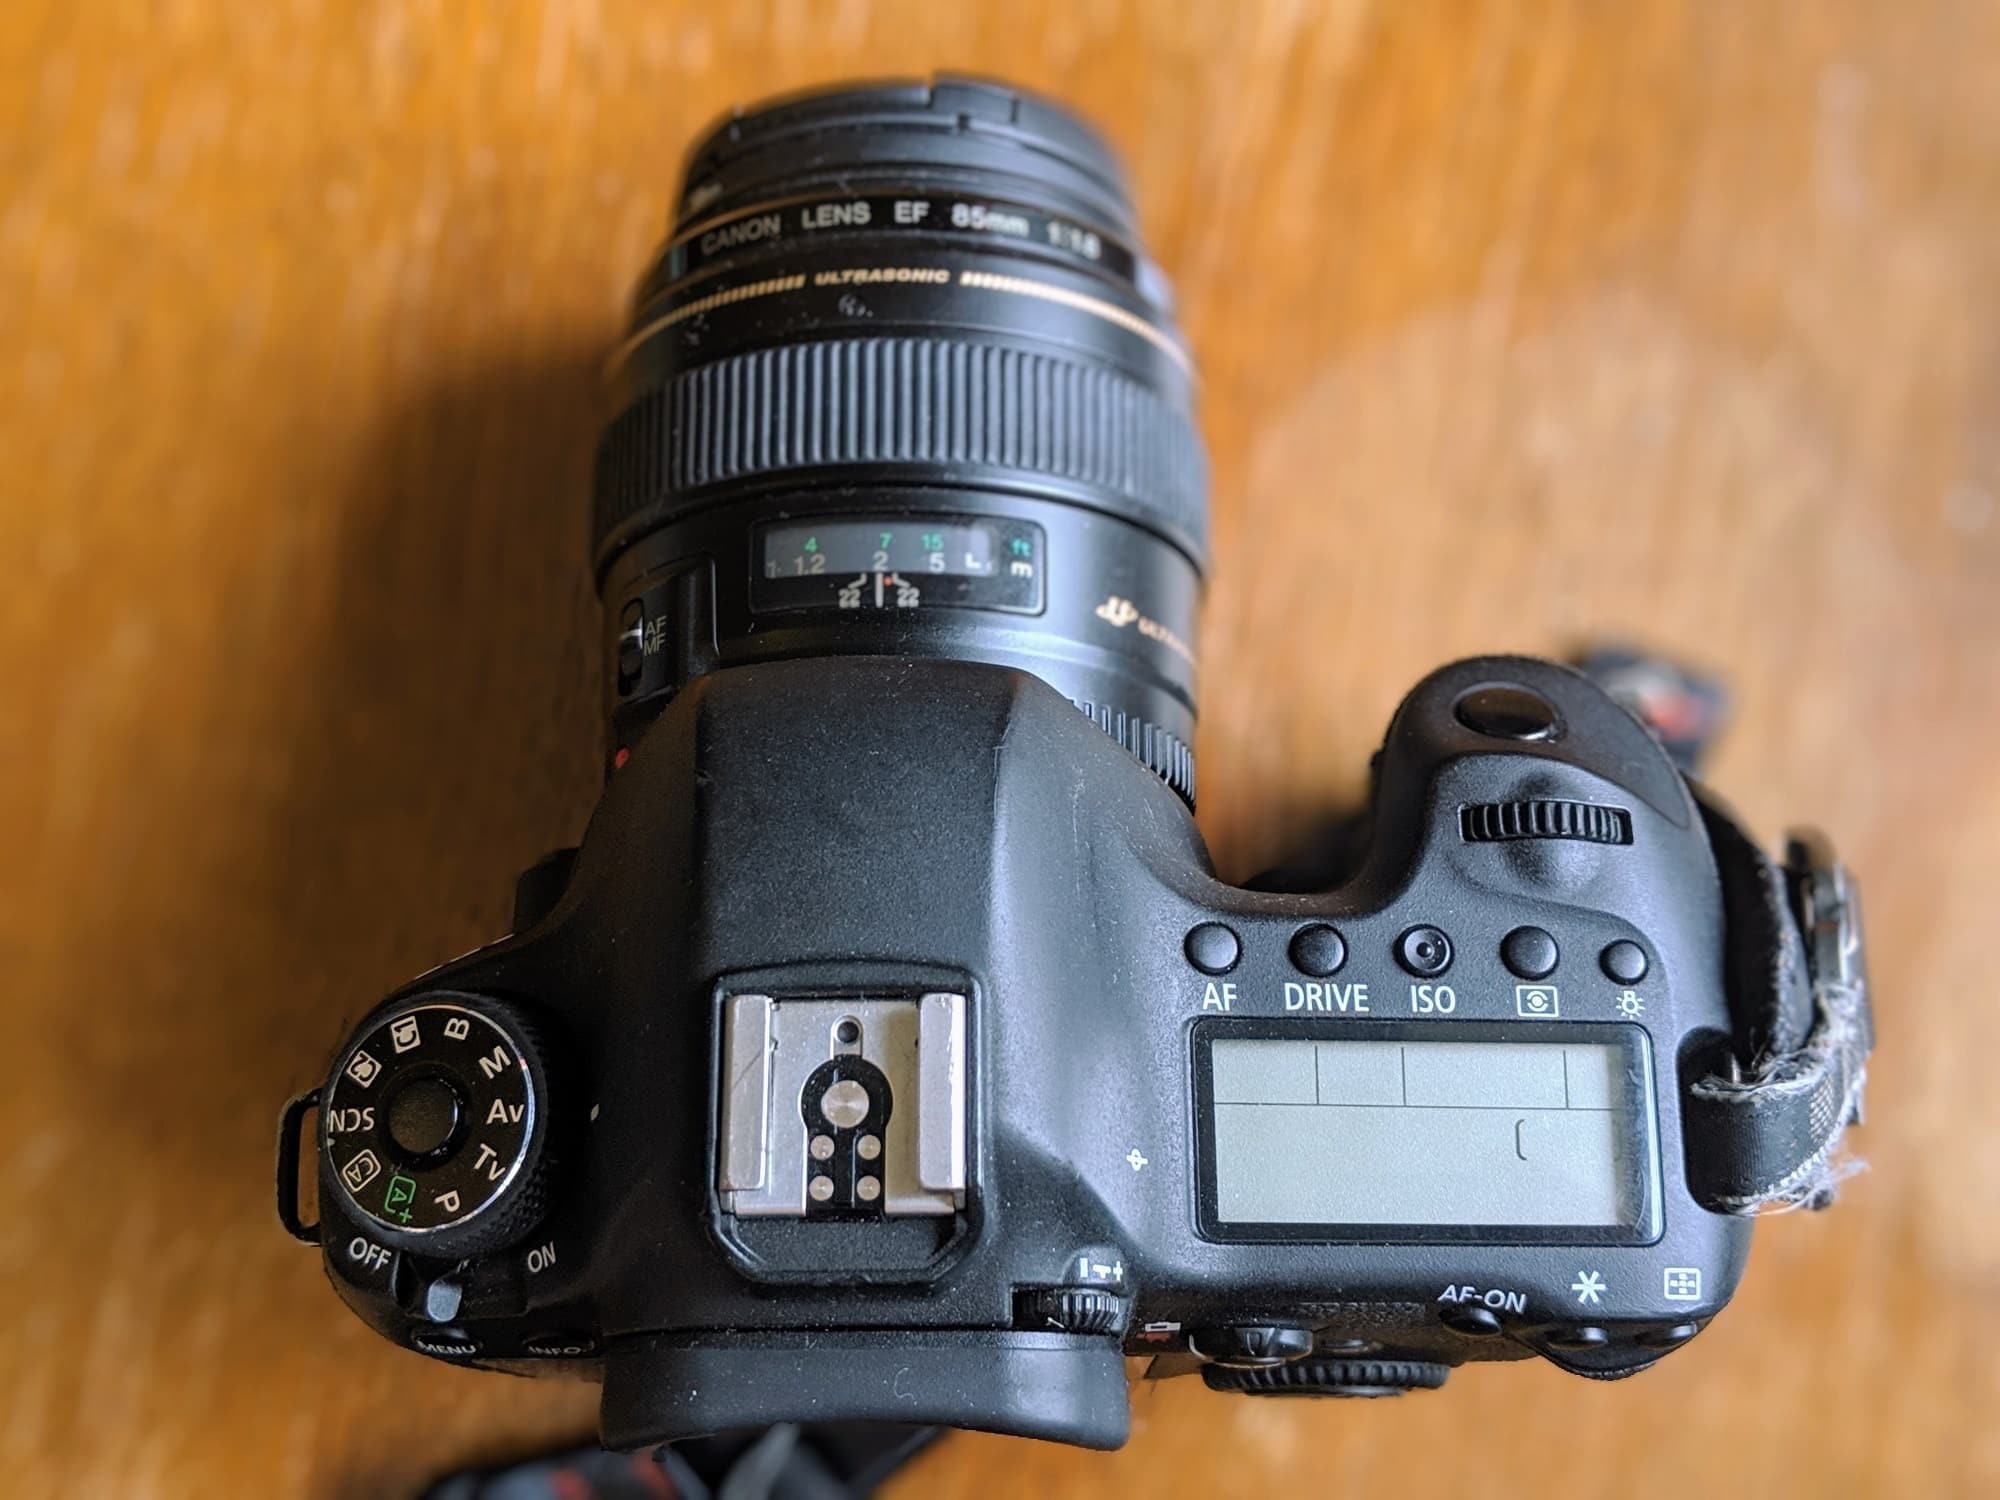
Hither's an overview of the key controls on your DSLR Camera. Note that different camera models volition accept slightly dissimilar controls, but the bulk will have the post-obit options.
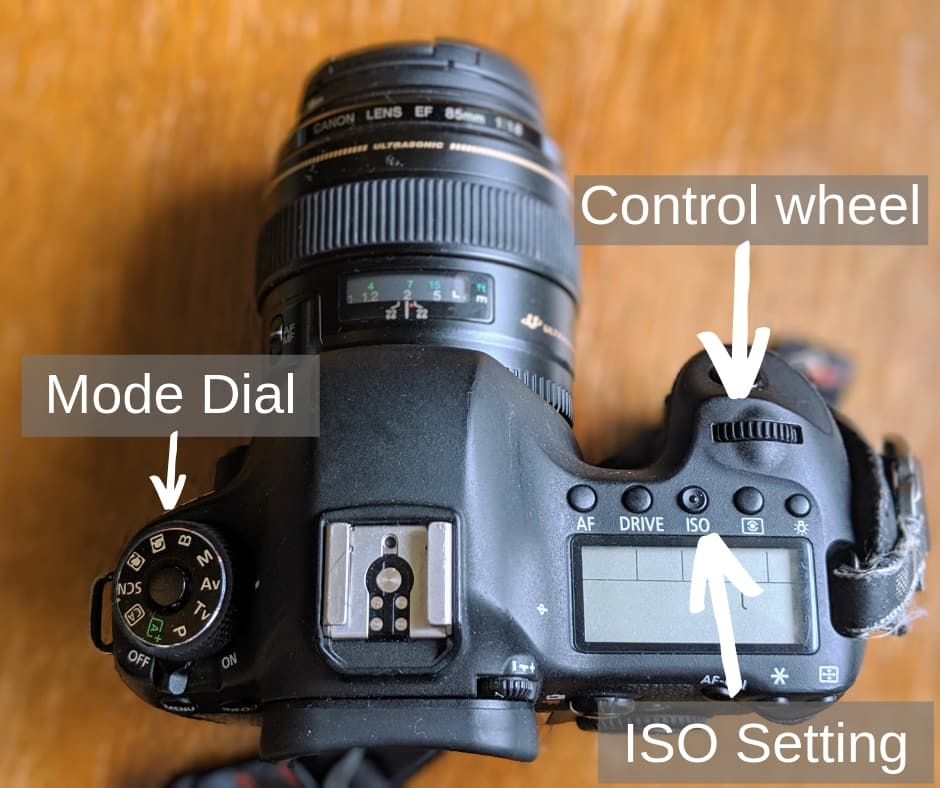
Mode Dial
The way punch is the first dial you'll want to locate. This is the dial that tells the camera how much control you want over its various settings. To change the mode, you lot merely rotate the dial.
Most mode dials have a wide diverseness of options, which volition include an "Auto" style, for full automatic, and an "Thou" mode, for full manual.
They will also oft include a variety of scenery modes, which are automatic modes where y'all give the camera a clue as to what sort of scene you are shooting, say a landscape or a portrait.
In between the Automatic and Manual modes there volition also usually be a number of other modes which bridge the gap betwixt fully automatic and fully manual, and it is these modes, particularly the final 2, that I suggest you become familiar with and showtime to use. These are as follows.
- "P" mode. This is the Plan Automatic mode. It is basically only another automatic style, admitting one where you accept command over some settings, including exposure compensation, ISO and white residuum. I would generally advise skipping over "P" and moving direct to one of the two modes below instead, "A" or "Southward".
- "A" or "Av" fashion. This is the Aperture Priority manner. This mode and the mode below are the half way house betwixt full automatic and full manual. Discontinuity priority mode means that yous gear up the aperture (useful for controlling depth of field) and the camera will judge the light in the scene and set the shutter speed to become the correct exposure. You can also control ISO, exposure compensation and white balance. Equally a landscape photographer, this is my go-to mode for 90% of my photos.
- "S", "T" or "Tv" mode. This is known every bit Shutter Priority Mode. Shutter priority is similar to aperture priority mode, except you set the shutter speed, and then the camera sets the aperture based on the lite in the scene. Shutter priority is good for when y'all want to control motion in a shot, such as for isolating the flying of a fast moving bird, or to testify movement in a long exposure shot.
Some photographers will tell yous that you accept to shoot in manual to have full control over your photos. Personally I disagree with this. The main matter is to sympathise what the different modes are, and what effect the dissimilar settings in your camera have on your shot.
Every bit long as you are comfortable with this, and you empathize how changing aperture, shutter speed and ISO can affect your shot, that is the key.
If you are unclear on how these three elements, known together as the exposure triangle, work together in photography, we have a detailed guide to the exposure triangle to help you out.
I likewise suggest reading my guide to depth of field in photography, which explains this in more item. You may besides consider signing up to my online photography grade, which covers the exposure triangle and much more than in great detail.
In one case yous understand the relationship between aperture, shutter speed, and ISO, the choice of whether to shoot in manual, shutter priority, or aperture priority is upwardly to you. It will likely come downward to personal preference, and the scene you lot are shooting. There is no "correct" choice.
As a rule of pollex, I notice aperture priority works well for most of my photography because it lets me command depth of field, which is a cardinal compositional technique.
For portraits and landscape work, this is unremarkably more important to me than controlling motion – except when I am doing landscapes where I want to capture movement.
For any scene involving movement, such as action photography, shutter priority often is the most useful style. This lets me control whether I freeze the discipline with a fast shutter speed, or evidence a bit of motility with a slower shutter speed.
When a scene has particularly challenging lighting, or depth of field and movement are both cardinal considerations for the composition, so I volition shoot in manual. This is often the case for scenarios like fireworks photography, photos of the Northern Lights or any long exposure photography.
Exposure Compensation (+/-)
Nearly every photographic camera out at that place, including smartphones, will have some class of exposure compensation characteristic. This lets you apace make the epitome brighter or darker past either increasing or decreasing the exposure compensation.
The exposure bounty will either be a dedicated button or punch on the photographic camera, or will be easily accessible through the photographic camera's bill of fare arrangement.
As an caption for the proper name, when you lot take a photo, the process that camera goes through is actually known as an exposure. The sensor inside the photographic camera is "exposed" to the light. This is a throwback to the days of motion-picture show photography, when exposing the chemicals in the film to the light acquired it to react.
Today, the sensor only records the information electronically, but the term exposure has stuck.
Whatever fashion your photographic camera is in, information technology will ever judge the light in the scene. It uses this to calculate correct settings so as to go an epitome that is neither too brilliant nor as well dark, known as a correctly exposed image.
If your camera is in automatic style, all of this is done for you.
On a DSLR photographic camera, in Plan Automobile, Aperture Priority and Shutter Priority modes, you can override these settings with exposure compensation.
Equally an example, if you have your camera in aperture priority and set an aperture of f/8, the camera will calculate the exposure in the scene and ready the shutter speed to give what it thinks is a proficient exposure.
Sometimes withal the camera will get information technology wrong, and the paradigm will be as well dark or too light. Y'all can utilize exposure compensation to basically tell the photographic camera to increase or decrease the corporeality of light. Equally you take stock-still the aperture, the camera will adjust the shutter speed accordingly.
Exposure bounty is a quick and handy manner to suit the overall brightness of an image without having to go into full transmission mode.
Command Wheel for Shutter and Discontinuity
If you lot are shooting in aperture priority or shutter priority, you will demand a way to modify the aperture or shutter speed.
Nearly every photographic camera has a control cycle, which y'all rotate to increase or decrease these settings. If y'all are in aperture priority manner, the command wheel will increase and subtract the aperture setting.
If you are in shutter priority mode, the same wheel will increase and decrease the shutter speed.
If you are in manual, then you will need to be able to adjust both the shutter speed and the aperture. Unlike cameras handle this differently – some accept 2 wheels, some offer a push that yous depress to switch what you are changing.
Consult your photographic camera manual to see how to change discontinuity and shutter speed in manual mode.
ISO Push button
ISO is the third control you take over the exposure of an image. Increasing the ISO makes the camera's sensor more sensitive to the lite, and reducing it reduces the sensitivity to the light.
If y'all are in transmission fashion and set up the aperture and the shutter speed and so change the ISO, you lot will find the paradigm getting brighter and darker.
Withal, increasing the ISO also makes the prototype more than grainy, as the increased sensitivity of the sensor means that digital "noise" is added to the epitome.
As a upshot, ISO is commonly the last thing we want to increase. Ideally, ISO will stay at a range between ISO 100 and ISO 400, a range in which most cameras produce overnice make clean images.
Nevertheless, sometimes it is just too dark to produce acceptable images without increasing the ISO. For this reason, most cameras volition have a dedicated ISO button, which provides a shortcut for rapidly increasing and decreasing the ISO.
It is really important to call back to bank check the ISO before you lot take any image. If you set it to a loftier value manually, the photographic camera will think that value until you modify it.
I accept spoken with travelers who have ruined a whole trips worth of photos considering they set their ISO to a high value for an evening, and then forgot to put it back down to a lower value for the daytime.
It'southward really difficult to come across the resulting noise on the back of the camera screen – information technology's but when you get dwelling house and wait at your images that you volition notice the graininess in all your images.
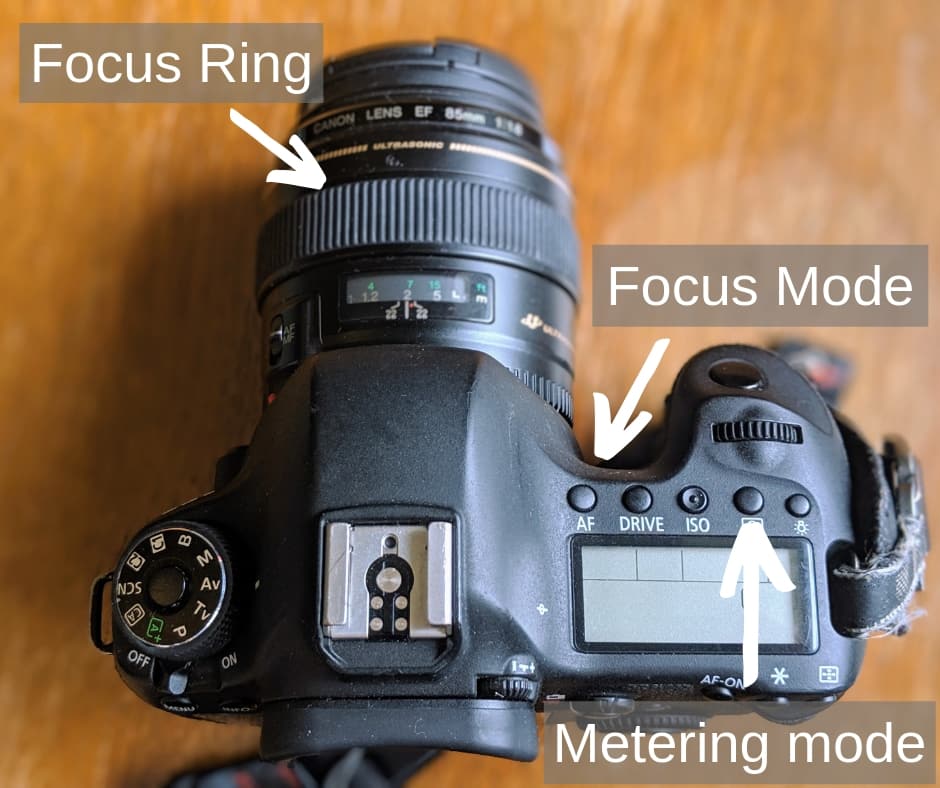
Focus Way
Focus is the procedure of ensuring the subject we are taking a flick of is sharp. An out of focus epitome will produce a blurry result that is non ideal.
To help with focus, DSLR cameras take a range of focus modes. Which you use will depend on what you are taking a photo of.
The first option that the camera is likely to be set up is the standard autofocus mode. In this mode, the camera volition default to focusing on what it thinks the discipline is. You tin can take command of this past specify the region of the paradigm you want the camera to focus by changing the image focal betoken.
This will either exist with a defended button on the camera, or perhaps by using a touchscreen interface to bear upon the focus point.
If your subject field is moving, and so the camera has a unlike focus fashion, which might be chosen continuous autofocus. It is called continuous because the camera will continue to adjust the focus as the subject field moves, rather than simply getting focus one time.
Finally, the camera will too permit y'all control the focus yourself manually. In this mode, you will take to accommodate the focus ring, which is normally institute on the cameras lens. It volition be a ring all the style effectually the lens which y'all tin can rotate to change the focus.
Metering Way
I have mentioned throughout the post that your camera evaluates the light in the scene you are taking a picture of in lodge to calculate the right exposure. This process, where the camera meters the light to come up with the correct exposure, is known as metering.
Y'all can alter the metering mode of your camera, depending on the scene you are taking a photo of, to aid ensure your subject is correctly exposed.
The principal command yous have is over how much of the scene is used for the metering. The default way, which will work for most photos, is known as evaluative metering on Catechism cameras and matrix metering on Nikon cameras.
This mode looks at the calorie-free across nearly the whole frame of your paradigm, to produce a counterbalanced exposure. This volition cover nearly all your photography requirements.
Sometimes nonetheless, we are shooting a scene with challenging lighting – like a dark building confronting a bright sky. In this case, the default metering mode might give y'all an image which is technically well balanced, but the building volition likely be too dark to be usable.
To resolve this, you could utilise exposure compensation, or y'all could change the metering mode.
Dissimilar cameras have dissimilar metering modes yous can choose. The most common is a spot metering mode or a partial metering mode, which means that camera volition merely use the center office of the scene to do its exposure calculation.
This ways that bright sections of the prototype effectually the edges away from the middle will not bear upon the final shot, and in our instance, the building would end up correctly exposed.
Focus Ring
The last two controls on your DSLR camera that we're going to talk about are on the camera's lens. The get-go one is the focus ring, which we briefly touched upon.
If your camera is in manual focus manner, the focus band is what you will employ to achieve focus. On some cameras, even if the camera is set to autofocus, you tin can override that with the manual focus ring likewise.
Focal Length Band
The focal length ring is as well on the photographic camera's lens, and is constitute on any lens that has a variable focal length. In basic terms, this is the camera'south zoom. Changing the focal length changes the zoom, and rotating the focal length ring is what yous do to change the zoom.
How to Utilise Your DSLR Photographic camera
I'yard now going to cover some tips and tricks for using your DSLR, and some areas you should focus on to improve your photography.
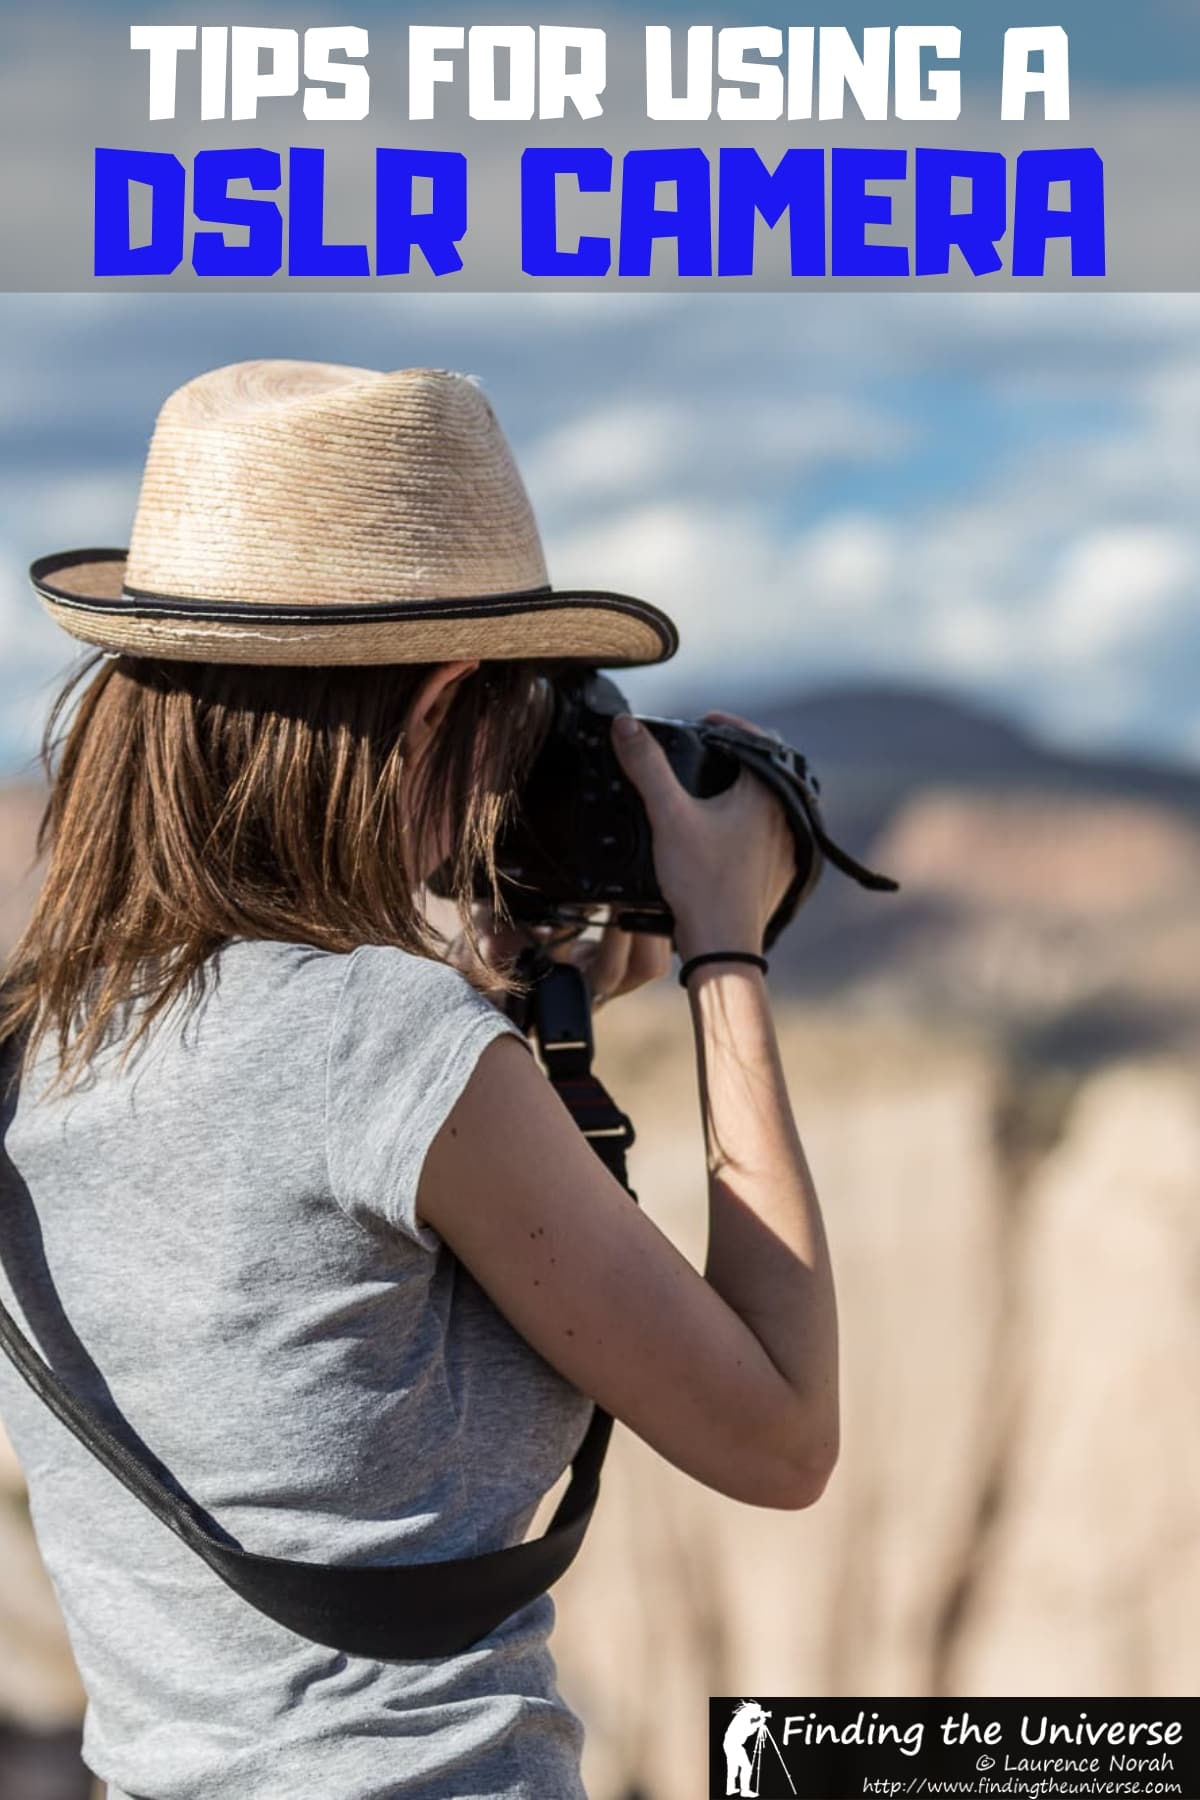
one. Larn How to Hold a DSLR Photographic camera Properly
The start matter you are going to need to do is learn how to hold your new DSLR camera properly. It'due south really important to try and minimise camera movement when taking photos, equally this will translate direct into blurry images.
Most DSLR cameras are relatively heavy, and should always be held with two hands. This will stabilize the camera a keen deal more than if you only endeavor to operate it one handed.
If you are right handed, the correct way to hold the camera is with your right hand around the hand grip and 1 of your fingers over the shutter button. I adopt to use my index finger for the shutter push. Attempt to ensure the residual of your fingers are tightly gripping the camera's grip, if they all fit.
Your other manus should be holding the cameras lens from underneath to support it.
Ideally, you volition have your elbows tucked in tight to your torso which will provide boosted stability.
If you struggle with maintaining stability when property a camera, consider investing in a travel tripod to provide the necessary stability that your camera needs for sharp photos.

2. Get the Horizon level
This is a personal bugbear – I find photos where the horizon isn't level to be quite off putting!
Sure, this is something that you can gear up in editing software, but rotating an image can degrade the quality. So ideally you lot desire to attempt and become the horizon level whilst you shoot.
Nearly cameras volition have the selection to overlay a grid on the screen, or markers inside the optical viewfinder that tin help with this, but ultimately information technology simply takes practise to go this right.
three. Empathise the Exposure Triangle
I've talked about the exposure triangle a number of times already in this post, and that'south because information technology'due south one of the nearly important photography concepts to understand if y'all desire to take command over your camera.
It tin can besides a fairly challenging concept that takes time to sympathise, because it includes three different variables, all of which also change how the terminal prototype looks.
The Exposure Triangle is called the exposure triangle because information technology refers to the three things you can alter, all three of which bear on the exposure of the image.
The three things yous tin can conform to change the exposure of the image are the aperture, the shutter speed and the ISO.
The aperture is a pigsty inside the lens which lets light through. You can brand this hole bigger or smaller, to permit more or less lite through.
The shutter is like a mantle inside the camera that whisks aside to let light onto the sensor. Irresolute the shutter speed changes the length of time the shutter is open up – longer fourth dimension lets more than light through, less time lets less calorie-free through.
As you will run across from the above ii controls, they are both related to how much lite is hitting the sensor.
The tertiary command yous take over exposure, and the third "side" of the exposure triangle, is the ISO setting. ISO controls how sensitive the sensor in your DSLR is to that incoming light.
If you increment the ISO, y'all increase the sensitivity, and vice versa.
You might wonder why y'all demand three dissimilar settings to essentially command the same affair – the exposure.
Well, the answer is that these three settings also control how the final paradigm will look. Aperture and shutter speed in detail are of import compositional tools, whilst ISO contributes to how noisy the paradigm is.
More specifically, aperture controls depth of field, and shutter speed controls how move is portrayed in a shot. These volition exist covered in the beneath tips in a bit more detail so you can see when and why you lot might want to change whatsoever of them.
You can besides read more almost the exposure triangle in my detailed guide to the exposure triangle here.

4. Master the Rules of Composition
I am of the belief that there are 3 main areas of photography that you demand to master to become great photos.
The starting time of these is understanding your photographic camera, which will permit you be sure you can set your camera up properly to go great images. This mail is primarily focusing on this area of photography.
The second thing you need to understand is composition, which is the art of placing your subjects within the image and using elements of the world to create a visually pleasing image.
Limerick includes things like the dominion of thirds, use of colour, leading lines and framing. As you would imagine though, such a major topic requires more than a few sentences to properly cover, and as such I've written a total guide to photography limerick which you should check out.
Finally, the third thing I think anybody should master is photo editing, which is how you become the most from the photos you've captured with your DSLR. As a starter with that, I recommend checking out my guide to the all-time photo editing software which will give you lot some pointers as to what options are on the market for photo editing.
5. Learn nigh Depth of Field
As I discussed in my department on the exposure triangle, aperture controls depth of field. Then you might exist wondering what this is.
Well, if you've ever seen a portrait shot, where the subject is clearly in focus, and everything else in the shot is nicely blurred away, and so yous accept seen an example of a shallow depth of field.
Depth of field basically refers to how much of the image is in focus in front end of and backside the subject, relative to the camera.
For landscapes, y'all usually want the majority of the image is focus, so you would want a deep depth of field. For portraits, you lot desire the opposite, and so you would want a shallow depth of field.
Changing the aperture changes the depth of field. For more on this, see my guide to depth of field in photography, which covers this subject in much more than depth.
vi. Consider Movement
Movement can be a powerful compositional technique, and this is controlled by shutter speed, some other part of the exposure triangle.
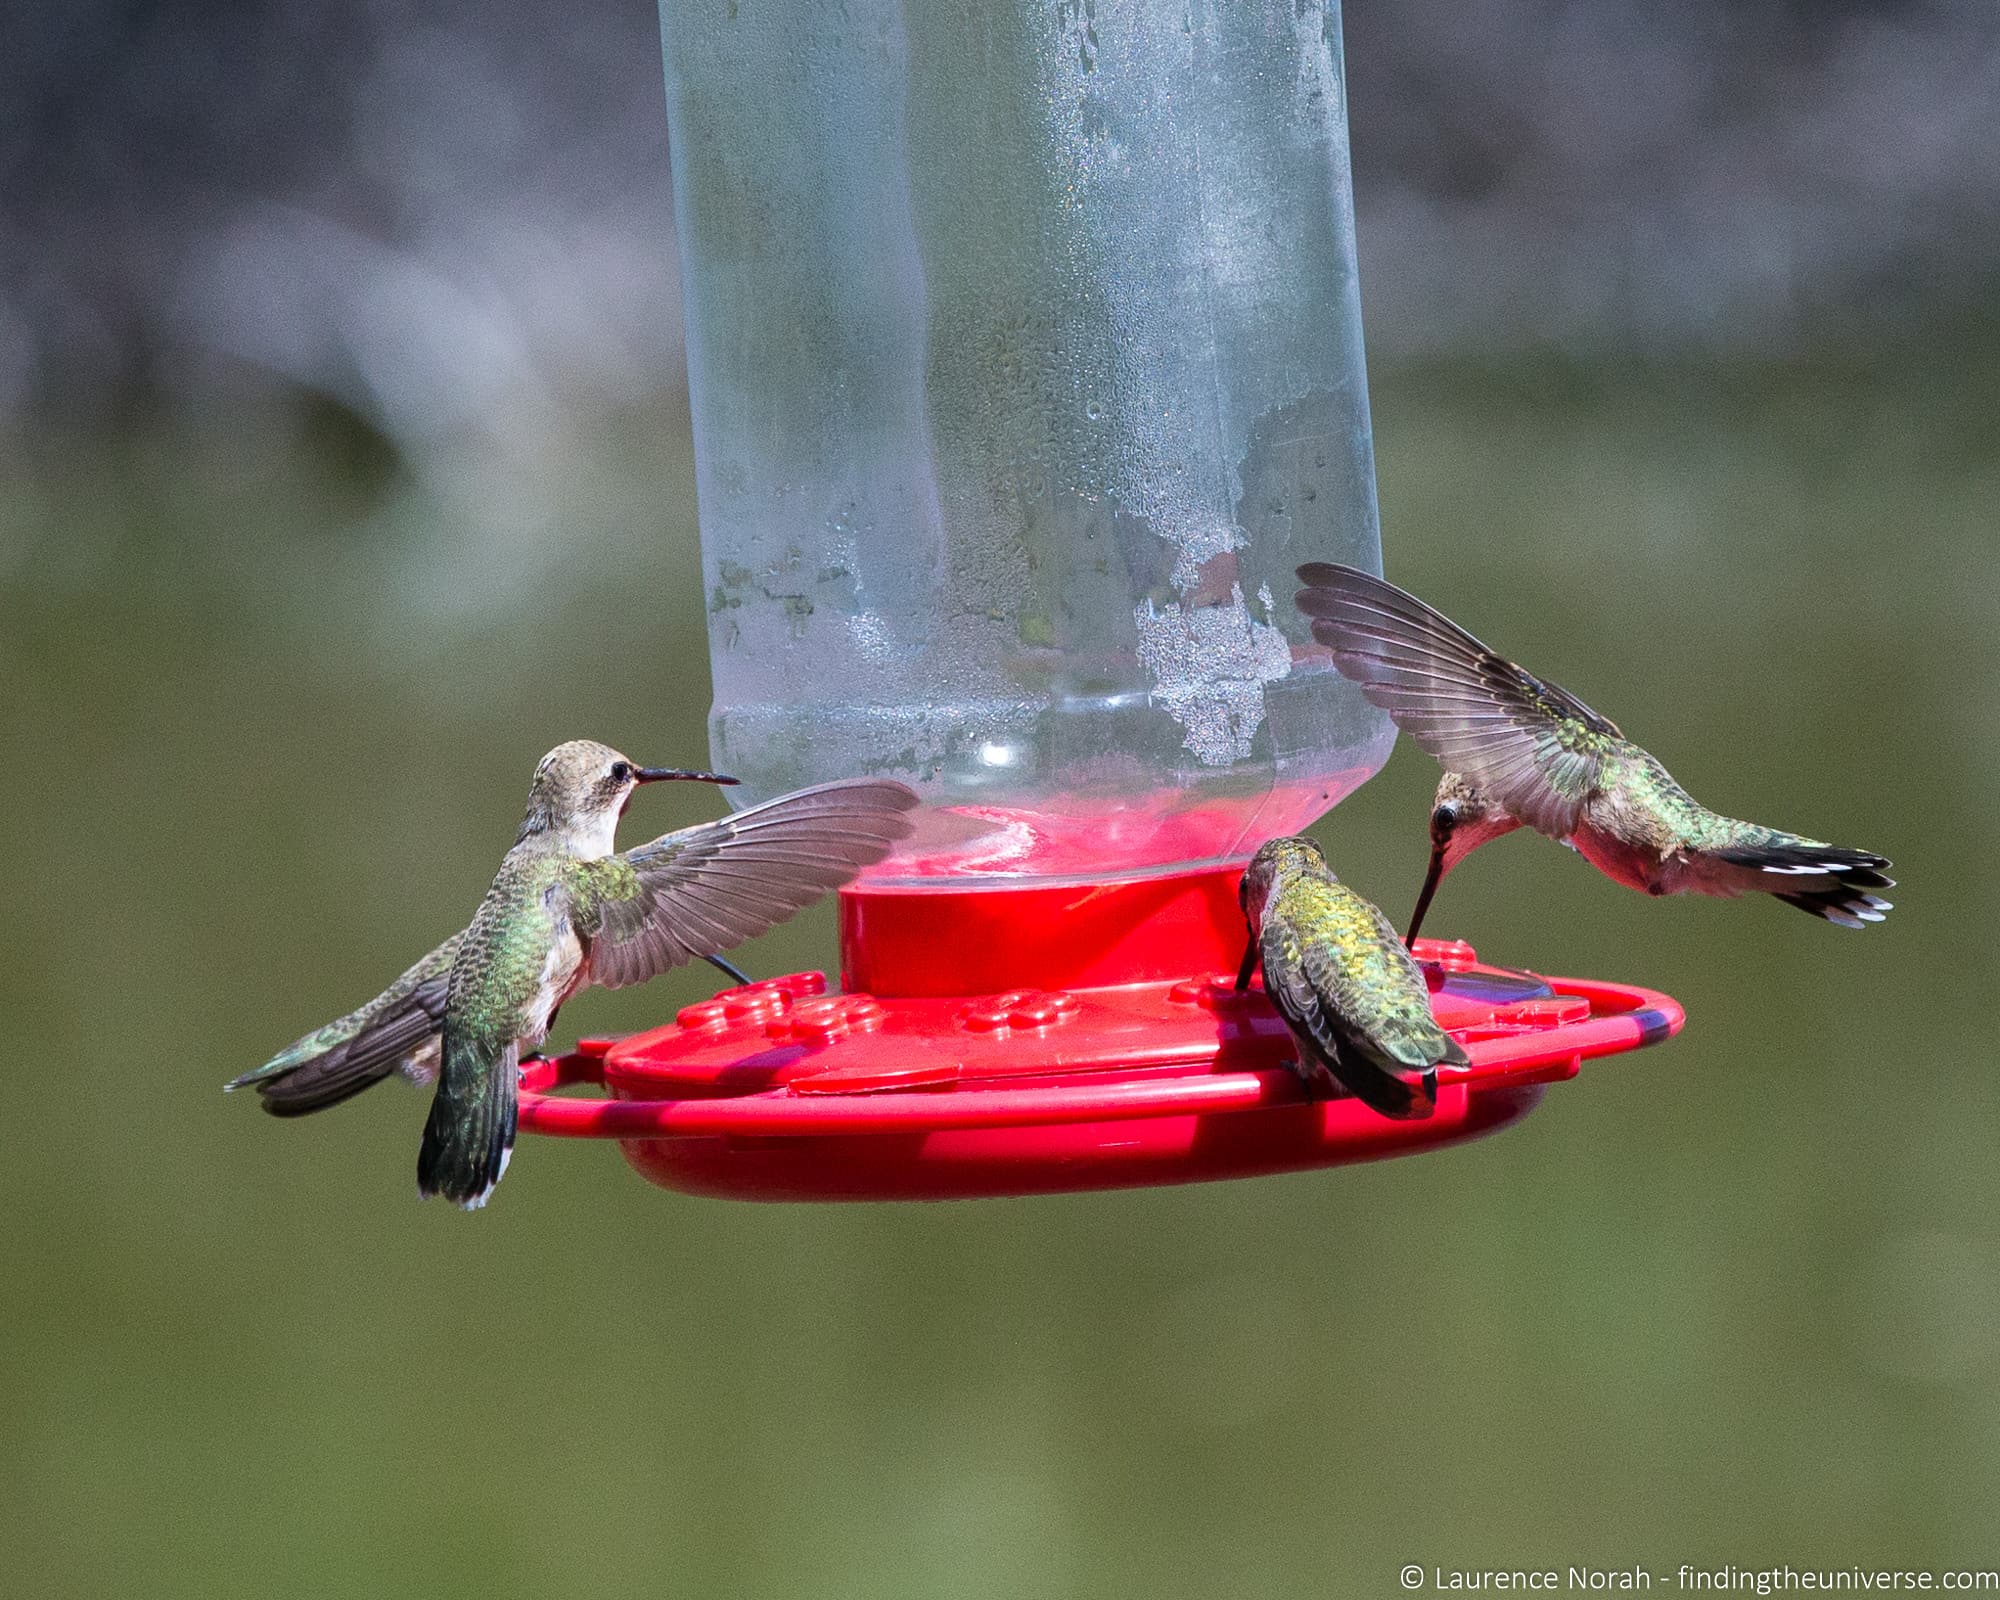
When you want to freeze motility in an image – say that of a hummingbird flapping information technology'south wings, or a fast moving vehicle, yous will want to apply a fast shutter speed. Fast in this context might exist anything from 1/500th of a second and higher.
On the other hand, if y'all desire to show motion in your images – peradventure the movement of water, or give the impression of movement by blurring a person who is moving, you would utilise a slower shutter speed. In this case, slow would generally exist anything from 1/15th of a second and slower.
For more on using shutter speeds to control how your image looks, take a wait at my guide to long exposure photography, which covers this subject field in more item.
Hopefully now y'all tin can see how discontinuity and shutter speed affect your final image differently, and see why information technology'south and so important from a composition point of view to sympathize how to alter these yourself rather than leaving information technology up to the camera!
7. Employ the Light
Photography is all about light. The photos yous capture are basically that – the calorie-free in the world, reflecting off surfaces, and being recorded by the sensor in your camera.
So every bit you would imagine, understanding how all-time to use low-cal will aid you with your photography no finish.
Kickoff, you demand to appreciate that the position and angle of the calorie-free relative to your shot will make a big difference. An overhead light will create flatter images, whilst a low low-cal will create more visually pleasing images with depth.
This is why shooting at the outset and end of the day is by and large preferred. The light at these times of day is too a nice yellow tone, which we refer to as being warm. This also makes for more than pleasing images.
Every bit a general rule, it's besides best to shoot away from your lite source rather than towards it. Shooting away from the light means your subjects volition be correctly illuminated rather than in shadow.
eight. Practice, do, practice
I recollect I have already mentioned this in the post a few times, but just to reiterate, photography is a skill that takes fourth dimension to master.
Until yous kickoff putting concepts like those I outline in this post into actual practice, they won't really stick or make as much sense. I urge you to grab your camera and start playing with the different settings I've talked about in this mail service.
Get an idea of how changing different things changes the image. Larn how to read the shutter speed, discontinuity and ISO readouts that your camera overlays in the viewfinder. Play with exposure compensation.
It tin can exist a good idea to set yourself challenges, and to get into the addiction of taking your photographic camera with you when y'all leave the house so you can get some practice in.
I definitely can't emphasise this enough – practise makes perfect with every skill, and photography is no different.
How to Treat and Protect your New DSLR
At present you accept your DSLR Camera, you volition want it to last for a skilful long while. And with these tips, it volition.
How to Protect your DSLR
A DSLR is a fairly robust piece of equipment, just information technology is notwithstanding a slice of electronics with a number of glass components, and as such, it does need to exist looked after.
The 2 accessories I propose you buy for your DSLR are a lens hood, likewise known as a sun hood, and a clear UV filter.
These volition both protect the lens on your DSLR. This is the bit that protrudes the most, and is the part of your photographic camera that is most susceptible to damage from every day knocks and bumps.
UV filters are relatively cheap (around $15 – $40 a piece), every bit are sun hoods. You just have to go them at the right size for your lens – this should exist conspicuously marked in the detail description.
For filters, every filter has a mm rating, which will lucifer the lenses filter thread bore. For example, most of my lenses accept a 77mm filter thread, so I use 77mm filters similar this.
You tin see a drove of UV filters here and lens hoods hither.
How to Clean your DSLR
Over fourth dimension, a DSLR will naturally pick up clay and dust from the environs. I find the two things that come in useful for cleaning it are an air blower like this, and micro fibre cloths like this.
These are also available as an inexpensive cleaning kit which contains a number of items for cleaning your camera that you might discover useful.
I don't do any internal cleaning of my camera other than occasionally bravado air to remove dust specks from the sensor. Come across my section below on DSLR photographic camera servicing for more than thorough cleaning options.
Tips for Traveling with a DSLR
If you are going to be traveling with your DSLR then I highly recommend buying a well designed camera pocketbook. Camera bags come with a lot of additional padding that you don't become in ordinary bags, and they besides usually have compartments for your different pieces of equipment, including lenses, spare memory cards, batteries and and so on.
You tin can also become camera bags that are designed to to also comport other items, with part of the handbag designed for camera equipment, and the other part for travel items like clothing.
I utilise and travel with Vanguard bags, who make a broad range of camera related products, including tripods, bags and other accessories. I've been a Vanguard ambassador for a number of years and their gear has always been reliable and well made.
They take a wide range of purse options, including this trolley bag, this backpack and this sling pocketbook. I suggest picking a bag that fits your gear plus a scrap more, and so you have plenty of room.
Discounted Price for Vanguard Products for our Readers!
Equally Vanguard Ambassadors we are able to offer you a unique discount lawmaking which will go you 20% off everything in the Vanguard USA, Vanguard Britain, Vanguard Kingdom of spain, and Vanguard Germany online store websites. Merely utilize codeFindingTheUniverse (case sensitive) on checkout.
You should always endeavour and keep your photographic camera equipment with you when travelling rather than checking it into hold luggage and so you can keep an eye on it and ensure it is handled properly.
Should you lot Service Your DSLR?
The brusque answer is yes. From time to time, I would propose getting your DSLR photographic camera and lenses properly serviced by a qualified technician.
I aim to get my cameras serviced around once a year, and ordinarily I observe a Canon certified dealer to exercise it for me. I've also been lucky to nourish some Catechism sponsored events like the Albuquerque Balloon Fiesta, where free servicing was offered.
A service volition usually involve a thorough clean of the sensor and a careful inspection of whatsoever other elements of the hardware. I can definitely recommend trying to get this done on a adequately regular basis to keep your camera in good working club.
Best DSLR Camera for Beginners
If you came to this postal service and you don't already take a camera, you might be wondering what the best DSLR camera is for you to starting time with.
We actually have a detailed guide to the best DSLR cameras for travel photography, which covers a range of brands and budgets.
However, for starting out, we suggest you lot consider the following ii entry-level DSLR models. These have all the features y'all need to learn photography, but won't break the depository financial institution.
i. Canon EOS Rebel T7 (EOS 2000D)
In the world of DSLRs, there are two main manufacturers – Canon and Nikon. For an entry level camera, we would recommend getting ane from either of these manufacturers.
Canon'southward entry level camera line carries the "Insubordinate" name in North America (EOS xxxD in Europe), and my kickoff DSLR was a Canon Rebel XTi.

The EOS Rebel T7 shows just how much has changed since those days, with what would accept so been flagship technologies now available fifty-fifty in the low cease model. You get a 24MP sensor, WiFI and a 500 shot battery capacity.
2. Nikon D3500
The entry level Nikon DSLR camera is the D3500. It offers great performance in a slightly smaller package than the Canon, and besides has excellent battery life, rated for 1550 shots per charge.

You also get 24.two APS-C sized sensor, good performance and an excellent choice of lenses. This is a great first photographic camera that will last you for a good number of years.
When information technology comes to picking between these two cameras, some of information technology volition come downwards to how they experience in your hand. The interfaces are slightly different too, simply when you are starting out this doesn't make a big difference.
In terms of what you lot become for your money, if you are manufacturer agnostic, the Nikon offers slightly better specifications for the same coin.
If y'all want to spend a bit more, or are looking for additional features like moving touchscreens, then take a expect at our DSLR camera post for many more options.
Further Reading
If you lot have recently picked up a DSLR camera, or are thinking of buying a new DSLR camera, then y'all are likely near the commencement of your photography journey. Well, I'one thousand here to help on that journeying – I've written a number of photography guides which I recollect you will find useful to assistance improve your photography.
These encompass a broad range of topics, from beginner content through to intermediate and more advanced concepts. Here'southward a option to get you lot started.
- We take similar guides for how to utilise a mirrorless camera and how to use a compact camera.
- If you're interested in learning more than almost how a DSLR works, see our DSLR photographic camera guide.
- Knowing how to compose a great photo is a key photography skill. See our guide to limerick in photography for lots of tips on this subject
- Once you've mastered aperture, you tin control depth of field. Read more nigh what depth of field is and when you would want to use it.
- If you lot have a lens with a zoom characteristic, you lot can accept advantage of something chosen lens compression to brand objects seem closer together than they are.
- We are large fans of getting the well-nigh out of your digital photograph files, and exercise to that you lot will demand to shoot in RAW. See our guide to RAW in photography to sympathize what RAW is, and why you lot should switch to RAW equally soon as you can.
- You're going to need some way of editing your photos. See our guide to the best photo editing software, also our our guide to the best laptops for photo editing. We besides have a guide to getting the all-time functioning out of Adobe Lightroom, our preferred editing software.
- If you're looking for advice on specific tips for different scenarios, we besides have you covered. See our guide to Northern Lights photography, long exposure photography, fireworks photography,
- tips for taking photos of stars, and cold atmospheric condition photography.
- You may hear photographers talking near a concept called back push button focus. If y'all've ever wondered what that is, and want to know how to start using information technology, encounter our guide to back push focus.
- For landscape photography, you might find you lot need filters to achieve the await you want. See our guide to ND filters for more on that.
- If you're looking for a not bad gift for a photography loving friend or family member (or yourself!), accept a look at our photography gift guide,
- If you lot're in the market for a new camera, we have a detailed guide to the best travel cameras, as well every bit specific guides for the all-time cameras for hiking and backpacking, the best compact photographic camera, all-time mirrorless photographic camera and best DSLR camera. We too have a guide to the all-time photographic camera lenses.
- Nosotros have a guide to why you lot need a tripod, and a guide to choosing a travel tripod
- Ever wondered how to easily replace the sky in an image? Cheque out our guide to sky replacement in photography for an piece of cake procedure anyone can do.
Looking to Improve Your Photography?
If you constitute this post helpful, and you want to improve your photography overall, you lot might want to check out my online travel photography course.
Since launching the class in 2016, I've already helped over 2,000+ students learn how to take better photos. The course covers pretty much everything yous need to know, from the basics of how a camera works, through to composition, light, and photo editing.
Information technology also covers more than avant-garde topics, including astrophotography, long exposure photography, flash photography and HDR photography.
You lot get feedback from me every bit you progress, access to webinars, interviews and videos, as well every bit exclusive membership of a Facebook group where you can go feedback on your piece of work and take part in regular challenges.
It'southward available for an astonishing one-off price for lifetime admission, and I recollect you should cheque it out. Which you tin can do by clicking here.
And that'due south it for our detailed guide to getting the most out of your new DSLR. As always, we're happy to take feedback and answer your questions – just pop them in the comments below and we'll get back to yous as soon as we can.
Source: https://www.findingtheuniverse.com/dslr-camera-beginners-guide/
Posted by: swisherequat1983.blogspot.com
0 Response to "How To Shoot With Dslr Camera"
Post a Comment